Difference between revisions of "Whitelists and Blacklists"
| (11 intermediate revisions by 2 users not shown) | |||
| Line 5: | Line 5: | ||
Determines what email addresses and / or domain names Mailwall does once does not scan for spam content. | Determines what email addresses and / or domain names Mailwall does once does not scan for spam content. | ||
| − | In effect an email address and /or domain name that is included in the “Whitelist” will never be treated incorrectly or otherwise as Spam. | + | In effect an email address and /or domain name that is included in the '''“Whitelist”''' will never be treated incorrectly or otherwise as Spam. |
| − | To add an email address or domain insert the email address or domain name in the space provided and click on “Add domain/email” | + | To add an email address or domain insert the email address or domain name in the space provided and click on '''“Add domain/email”''' |
| − | + | *First click on the Domain Name on the top navigation bar. | |
| − | After selecting the required setting then click on “Save Spam Settings” | + | [[File:DomainNameTop.gif]] |
| + | |||
| + | * Look under '''Spam settings''' -> '''Filter, Black and Whitelists''' | ||
| + | |||
| + | [[File:Spam.gif]] | ||
| + | |||
| + | [[File:Whitelist.gif]] | ||
| + | |||
| + | To remove an email address or domain name highlight the entry in the “Whitelist” and Click on “Remove Selected”. | ||
| + | |||
| + | After selecting the required setting then click on '''“Save Spam Settings”''' | ||
'''Blacklists''' | '''Blacklists''' | ||
| − | Determines what email addresses and / or domain names Mailwall automatically store in the Domain's or User's “Spam Quarantine”. | + | Determines what email addresses and / or domain names Mailwall automatically store in the Domain's or User's '''“Spam Quarantine”'''. |
| − | In effect an email address and /or domain name that is included in the “Blacklist” will never be delivered as valid or non-Spam email. | + | In effect an email address and /or domain name that is included in the '''“Blacklist”''' will never be delivered as valid or non-Spam email. |
| − | To add an email address or domain insert the email address or domain name in the space provided and click on “Add domain/email” | + | To add an email address or domain insert the email address or domain name in the space provided and click on '''“Add domain/email”''' |
| − | To remove an email address or domain domain name highlight the entry in the “Blacklist” and Click on “Remove Selected”. | + | To remove an email address or domain domain name highlight the entry in the '''“Blacklist”''' and Click on '''“Remove Selected”'''. |
| − | After selecting the required setting then click on “Save Spam Settings” | + | After selecting the required setting then click on '''“Save Spam Settings” |
| + | ''' | ||
| + | [[Category:MailWall]] | ||
Latest revision as of 16:45, 29 February 2012
What are MailWall Whitelists and Blacklists?
Whitelists
Determines what email addresses and / or domain names Mailwall does once does not scan for spam content.
In effect an email address and /or domain name that is included in the “Whitelist” will never be treated incorrectly or otherwise as Spam.
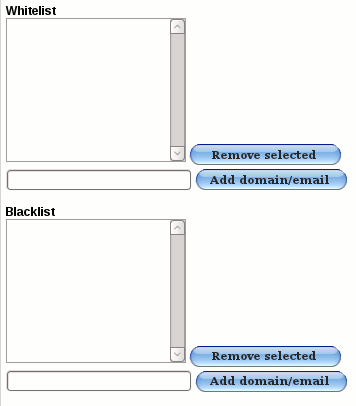
To add an email address or domain insert the email address or domain name in the space provided and click on “Add domain/email”
- First click on the Domain Name on the top navigation bar.
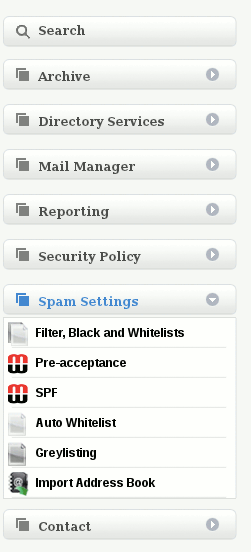
- Look under Spam settings -> Filter, Black and Whitelists
To remove an email address or domain name highlight the entry in the “Whitelist” and Click on “Remove Selected”.
After selecting the required setting then click on “Save Spam Settings”
Blacklists
Determines what email addresses and / or domain names Mailwall automatically store in the Domain's or User's “Spam Quarantine”.
In effect an email address and /or domain name that is included in the “Blacklist” will never be delivered as valid or non-Spam email.
To add an email address or domain insert the email address or domain name in the space provided and click on “Add domain/email”
To remove an email address or domain domain name highlight the entry in the “Blacklist” and Click on “Remove Selected”.
After selecting the required setting then click on “Save Spam Settings”

