Difference between revisions of "Accessing Zimbra Collaboration Suite with Apple Mail"
| (35 intermediate revisions by the same user not shown) | |||
| Line 1: | Line 1: | ||
| + | == Accessing Zimbra Collaboration Suite with Apple Mail == | ||
| + | |||
| + | This guide assumes that Apple Mail is already installed on your computer. | ||
| + | |||
| + | To access your email, you must have the following information: | ||
| + | |||
| + | * Your Zimbra email address and password. | ||
| + | * '''Incoming mail server'''. This will be '''connect.mailwall.com''' | ||
| + | * '''Outgoing mail server''' (SMTP). This will be '''smtp.mydomain.com''' (mydomain.com is your domain name without www. at the begining) | ||
| + | |||
| + | The following steps guide you through setting up a new account in Apple Mail. | ||
== To create a new account in Apple Mail == | == To create a new account in Apple Mail == | ||
| Line 17: | Line 28: | ||
Click '''Continue'''. | Click '''Continue'''. | ||
| − | 3. Under Incoming Mail Server, provide the following information: | + | 3. Under Incoming Mail Server, provide the following information: '''connect.mailwall.com''' |
[[File:Apple2.gif]] | [[File:Apple2.gif]] | ||
| − | * '''Incoming Mail Server''' - | + | * '''Incoming Mail Server''' - connect.mailwall.com |
* '''User Name''' - This is your Zimbra username, including domain. For example: john.doe@example.com. | * '''User Name''' - This is your Zimbra username, including domain. For example: john.doe@example.com. | ||
* '''Password''' - This is your Zimbra password. | * '''Password''' - This is your Zimbra password. | ||
| Line 27: | Line 38: | ||
Click '''Continue'''. | Click '''Continue'''. | ||
| − | 4. Under Outgoing Mail Server, provide the following information: | + | 4. Under Outgoing Mail Server, provide the following information: '''smtp.mydomain.com''' |
[[File:Apple3.gif]] | [[File:Apple3.gif]] | ||
| − | * '''Outgoing Mail Server'''. | + | * '''Outgoing Mail Server'''. smtp.mydomain.com |
* '''Use Authentication'''. Select whether to use authentication when sending outgoing mail. If you choose to use authentication, provide your Zimbra user name and password. | * '''Use Authentication'''. Select whether to use authentication when sending outgoing mail. If you choose to use authentication, provide your Zimbra user name and password. | ||
Click '''Continue'''. | Click '''Continue'''. | ||
| − | 5. Under Outgoing Mail Security, provide the following information: | + | 5. Under Outgoing Mail Security, provide the following information: '''Uncheck the small Box''' |
| − | |||
| − | |||
| − | + | [[File:Apple5.gif]] | |
| − | + | '''Use Secure Sockets Layer (SSL)''' - '''Uncheck''' - Use Secure Sockets Layer In the typical case this would be checked but because we are using smtp.mydomain.com, we uncheck it. | |
| − | |||
| − | |||
| − | |||
| − | |||
Click '''Continue'''. | Click '''Continue'''. | ||
| − | 6. Under Account Summary, review your account information. To make corrections, click Go Back. When your account information is correct, click Continue. | + | 6. Under Account Summary, review your account information. To make corrections, click Go Back. When your account information is correct, click '''Continue'''. |
| − | 7. Under Conclusion, you can choose to Import Mailboxes or Create Another Account. If you are finished, click Done. | + | 7. Under Conclusion, you can choose to Import Mailboxes or Create Another Account. If you are finished, click '''Done'''. |
Your account has been created and can now be used to access your Zimbra Mail. | Your account has been created and can now be used to access your Zimbra Mail. | ||
| + | |||
| + | If you acquire anymore assistance, our support team can try assist you through the configuration process, | ||
| + | |||
| + | You can contact Support at: 01 2805000 | ||
| + | |||
| + | [[Category:Zimbra]] | ||
Latest revision as of 13:58, 17 April 2012
Accessing Zimbra Collaboration Suite with Apple Mail
This guide assumes that Apple Mail is already installed on your computer.
To access your email, you must have the following information:
- Your Zimbra email address and password.
- Incoming mail server. This will be connect.mailwall.com
- Outgoing mail server (SMTP). This will be smtp.mydomain.com (mydomain.com is your domain name without www. at the begining)
The following steps guide you through setting up a new account in Apple Mail.
To create a new account in Apple Mail
1. Go to File>Add Account. This will open the Account Wizard.
Note: If you have opened Apple Mail for the first time, the New Account dialog will automatically open.
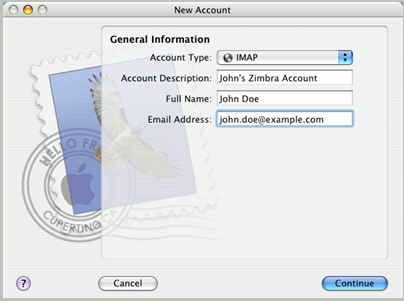
2. Under General Information, provide the following information.
- Account Type- Select either IMAP (mail stored on the server) or POP (mail downloaded to Apple Mail; no copy on the server). IMAP is usually recommended if you plan to access your account from multiple computers and if you want the server's administrator's to take care of mail backups for you.
- Account Description - Enter a name for your new Apple Mail account. This doesn't have to be your email address.
- Full name. - Enter the name you want to use in your new Apple Mail account - This will show up as the name you send out as.
- Email Address - Enter your Zimbra email address.
Click Continue.
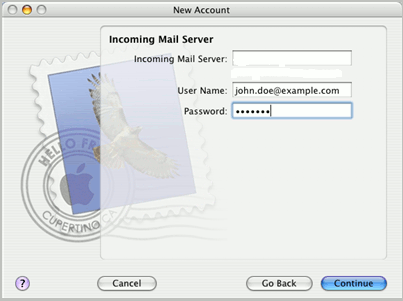
3. Under Incoming Mail Server, provide the following information: connect.mailwall.com
- Incoming Mail Server - connect.mailwall.com
- User Name - This is your Zimbra username, including domain. For example: john.doe@example.com.
- Password - This is your Zimbra password.
Click Continue.
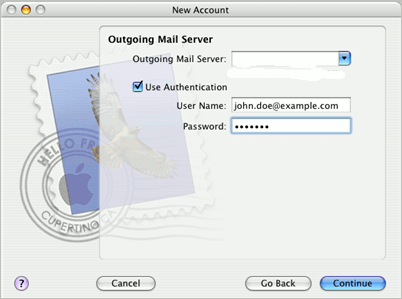
4. Under Outgoing Mail Server, provide the following information: smtp.mydomain.com
- Outgoing Mail Server. smtp.mydomain.com
- Use Authentication. Select whether to use authentication when sending outgoing mail. If you choose to use authentication, provide your Zimbra user name and password.
Click Continue.
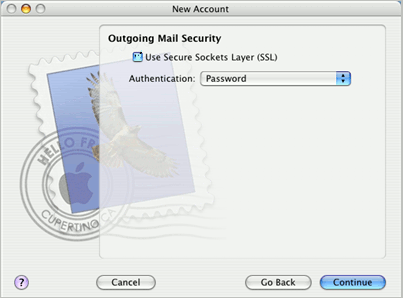
5. Under Outgoing Mail Security, provide the following information: Uncheck the small Box
Use Secure Sockets Layer (SSL) - Uncheck - Use Secure Sockets Layer In the typical case this would be checked but because we are using smtp.mydomain.com, we uncheck it.
Click Continue.
6. Under Account Summary, review your account information. To make corrections, click Go Back. When your account information is correct, click Continue.
7. Under Conclusion, you can choose to Import Mailboxes or Create Another Account. If you are finished, click Done.
Your account has been created and can now be used to access your Zimbra Mail.
If you acquire anymore assistance, our support team can try assist you through the configuration process,
You can contact Support at: 01 2805000


